Sunday, April 14, 2013

Center Stand

I suppose a center stand is not absolutely necessary, but I wanted one for a couple reasons.  Firstly its safer and your bike won't fall over when on hot pavement or dirt.  I like it also for working on the bike or god-forbid I have to fix a flat out in the woods.  The Happy Trails Centerstand is sturdy, well made, and a simple 15 minute install.


It folds up out of the way and should not drag under normal use.  I did notice that before I upgraded my suspension, if I had the bike leaned over and hit a dip and bottomed the suspension, I could just touch the ground with one of the legs - nothing bad.  I'm a bigger guy, and I really needed to upgrade the suspension anyway, and after I did this problem went away.   

Handguards

I haven't really had that much trouble with brush hitting my hands but I've had major trouble snapping off my brake and clutch levers, so for that reason alone these are worth it.  I chose the Moose Racing Aluminum Handguards.


Installation is straightforward except for a couple of things.  First you'll have to cut off the cable loop on the left side of the handlebars.  A Dremel comes in handy here to cut and grind it smooth.  The other BIG thing, is that you need to get a pair of 1/2" spacer thingie like the shown in the photo that extend the stem attached to the bar, or else your bars will not fit over the handlegrip housings.  Unfortunately those little spacers are not included in your kit so you'll need to order them and they run about $9.


Tuesday, December 4, 2012

Handlebar Risers

As I got more into serious off-roading, I realized the value of being up out of the saddle in a standing position often.  There are a number of maneuvers that are better standing up, and a higher handlebar position makes this easier and is also nicer for your arms when sitting on long rides.  In order of priority, the first upgrade definitely is the foot pegs for enhancing your riding position, but a second "nice to have" is handlebar risers.

There are a number of basic block risers that would work, but I chose the Rox Speed FX anti-vibration stem clamps.  I didn't have too much trouble with vibration myself, but the bigger attraction for me was that these bring you up at least an inch and a half, which is not easy to do with simple blocks. 


Installation - read this first and avoid my mistakes

The risers themselves are easily installed.  Those same hex socket ends I recommended earlier will come in handy. The real installation problem is that you must re-route your cables.  I fooled myself into thinking that the slack in the cables, while tight, was enough that I could make it work.  And I figured that after I rode awhile the cables would naturally slip a bit more from under the tank and it would all work out.  Wrong!  There was enough play all right except for when you max'd out the turn.  After one max turn the cable seemed to lengthen just a bit and I thought everything was great now.  But what really happened was that I had pulled the cable out from the carb and damaged the choke assembly.  Of course, this happened when I was in middle of nowhere, and then I was riding with the choke partially on at all times and the engine running too rich, stalling every time I idled.


I made it back, and my friends at Rocky Mountain Kawasaki fixed the carb and re-routed the cables for a very reasonable cost.  I should have just had them do it in the first place!  Re-routing the cables is not a simple job so unless you're pretty good with the tools, I'd recommend paying for your local mechanic to do the job.

Friday, November 23, 2012

Suspension Upgrade

As I mentioned, I am a big guy so I always knew I was going to need to do something about the suspension.  The problem was I didn't really know what I needed or how to choose, so I spent quite a bit of time researching and testing in order to feel like I was making an informed choice. Here's a long-winded post on how I went through the whole process.

About the stock suspensions on dual sports

In fairness to Kawasaki and all other dual sport manufacturers, the stock suspension must be a compromise for a wide variety people, abilities, and terrain. And this compromise must fit in the price point that these bikes sell in.  It's basically impossible to create an all-around stock suspension that will also work for serious off-road riding, so you will definitely need to upgrade your suspension.  

My test program and standard test track

I really wanted to understand the handling of my bike and be very thorough in evaluating the before and after performance of the upgrades I made, so I set up a systematic way to evaluate my bike's baseline performance with the stock suspension, and then started making changes.

I am fortunate to live in a beautiful area of Boulder County Colorado, on the edge of town, so with a very short ride I'm out in the country.  Within a half mile I can be on a long dirt road with a variety of terrain: some stretches of light washboard, gravelly spots, hard pack, some sharp corners, and various straight stretches to build speed and then brake hard for the next corner. At the end of my test ride, on the short paved ride home, I have various curbing and terrain that I can hit it at various speeds to try to bottom out the front and rear suspension.

Baseline testing the stock suspension

As you might guess from what I've already said, the standard test track showed the stock suspension to be very mushy and slow to respond.  On soft stuff you feel like you're floating and the front wheel is trying to wander off in any direction. Hard braking is slow and wobbly because the suspension must compress a lot before the bike starts slowing down. On washboards the front wheel chatters and seems to bounce around.  In general I get a feeling of instability and the bike wanting to wander. I picked a place where I can hit the bottom of a dip at higher speed and easily bottom out the rear suspension. Its kind of an unfair test, but I could hit a sharp curb at 15+ miles an hour and easily bottom out the forks.  My size makes things worse obviously, but this is about what you can expect from any stock dual sport suspension.

The newer KLR's have a very accessible rear shock pre-load and dampening adjustment, so I cranked up both to the max.  I didn't expect miracles, but even at the highest settings I didn't see much difference. It was probably a little harder to bottom out the rear suspension, but that's about it.

Fork Brace

When researching different springing options for the front suspension, I came across discussion boards talking about needing a fork brace to take care of the inherent flexing of the Kawasaki fork. Not knowing what fork spring changes I wanted to make yet, I decided to try the brace first just to see if I could tell any difference before changing anything else.  I chose the Happy Trails K9 Fork Brace and  installation is dead simple - 20 minutes tops. The product is precision made and fits perfectly.


Back to the test track not really expecting to see much difference, but surprisingly I noticed it was immediately less likely to wander in the soft gravel and light washboard.  A fork brace by itself is no substitute for a suspension upgrade, but its definitely recommended and fairly inexpensive.

Going for it - upgrade both the front & rear suspension 

I was pleasantly surprised seeing even a small change in handling with the fork brace, which got me jazzed to get serious about doing more.  The stock suspension is lame enough that I personally believe you need to do both front and rear suspensions at the same time.  The problem was I looked at many different options and didn't have a good feel for how or why to choose one over another.  I was surfing the web, reading KLR forums, and no closer to deciding what do when I happened to be visiting the spring open house at my local dealer Rocky Mountain Kawasaki.  They were running a promotion for Progressive Suspension - a Monotube Cartridge Damper setup for the front and 
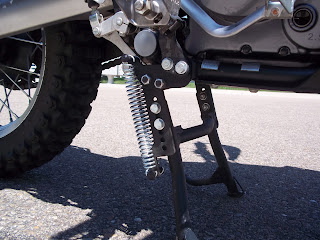
465 Series RAP (remote adjustable pre-load) rear.


This is the rear shock.  The front fork upgrade is all internal - the only evidence is an off color cap on the top of your fork tube.

It made sense to me that getting both front and rear components from the same manufacturer would be a good idea and ought to be a coordinated system.  I also do not have the time, the tools. nor the expertise to install suspensions myself, and considering how important they are to enough to my health and well-being I feel this is a good job to leave to the professionals.   There's also some installation choices that need to be made based on your weight and riding style, so I liked the idea of having some advice from experts.  So my decision was made - just need to drop my bike at my friendly local dealer to get it done.  

Back to the test track - OMG!

When I picked up my bike, just riding home on regular pavement there was a very noticeable difference in handling.  It was stiffer, but not overly hard.  It felt solid. 

On the test track it felt better immediately. On the light washboard the stability was amazingly better with less wandering. The front tire tire stayed in better contact with the ground because of better responsiveness and I soon found I was giving it gas and going over the washboard at a higher speeds without even realizing it.  Next was a high-speed braking stop and the suspension loaded sooner and started stopping quicker with less wandering.  All that previous mushy suspension travel during braking was actually less safe than I realized, causing the bike to feel squirelly.   Cornering in both gravel and hard pack was not hugely different than the stock suspension, but still felt more stable and responsive.    

Next I hit my favorite dip at high speed to bottom out rear suspension and it sailed right through.  I couldn't bottom it out no matter what I did.  I still haven't explored all the different ways to fine adjustments on the rear suspension pre-load, but its such an improvement already that I'm not in a hurry. 

The combination of the front shocks with the fork brace gave me a much better feeling of responsiveness and stability.  I hit my favorite curb at various speeds and was not able to bottom out the front suspension, although I got the feeling that there was a point where I could hit it hard enough to bottom it out.  There are some more adjustments that can be made if I wanted to prevent that, but I decided that I'm not looking to do the Paris to Dakar any time soon, and I'll stick with a little lighter but-still-firm setup I have now.

What a difference!  It literally tansformed my KLR into a different bike!

Just Do it!

I'm convinced that there is no other upgrade you can do that will improve your enjoyment more than this. Besides it handling better, it simply makes you feel safer and in control.  There's plenty of good options out there both more or less expensive than what I did.  I'd recommend doing both front and back done at the same time and getting some expert assistance from a local dealer or someone like Happy Trails.   And unless you're really knowledgeable and mechanically savvy, I'd leave the installation to the professionals.  

Sunday, November 4, 2012

Replace those stock footpegs NOW


As an Adventure Cycle Rider you will learn to spend a good bit of time standing up and using your feet to adjust your weight around on the bike.  You need a solid relationship between your feet and the cycle's footpegs, and those stock rubber footpegs are not just bad, they're dangerous!  They are slippery when simply dry and dusty, and if you get any kind of moisture on them they're extremely dangerous. In the best cases, you will slip off at inopportune times and cause you to fall over.  In the worst cases you injure your privates or your foot hits the ground while your still-moving bike peg gouges your calf.

Any serrated metal foot peg is a big improvement that will grip when wet and allow mud and dirt to fall through the center.  I am a big guy with a big foot and I wanted the biggest, widest I could find for stability while bouncing over rough terrain.

Pivot Pegz Mark 3

The Pivot Pegz Mark 3 are the widest (60mm) and lightest pivoting pegs on the market.  They are heavy duty with a big, aggressive gripping surface. Man, these are nice pegs! One of the disadvantages of an extra wide peg can be difficulty in shifting because there isn't as much room for your foot to pivot underneath the shift lever.  But Mark 3 solves this with a spring-loaded pivoting movement so your foot can rock forward but still gain all the benefits of a very wide foot base. They are little more expensive but I think they're well worth it.  Pivot Pegz are made in Australia and available on Amazon.


Thursday, November 1, 2012

Crash Bars and Skid Plate

Crash Bars are a Must

You must have crash bars because you have to get used to putting your bike down occasionally and not worrying about it.  I'm not hard-core and don't anticipate really tearing up my bike, but even those low-speed "excuse me" tip-overs can tear up all the fragile plastic parts on a KLR and you'll soon spend as much as if you had just put on the crash bars on in the first place.  The stock plastic skid plate is really not too bad for basic use - I unintentionally made some pretty good use of it going over some trees.  But as a practical matter you need a bigger, stronger metal skid plate and the stock one is not compatible with many of the crash bar setups.  So an upgrade is in order.

Happy Trails PD Nerf Plus Skid Plate 


The Happy Trails PD Nerf and Skid Plate Combo (PD for Paris to Dakar) is a sturdy, well designed combination crash bars + skid plate with the added bonus of foot pegs to rest your feet on those long rides. Installation is well within the average person's ability.  Be prepared to disassemble much of the plastic and fairings on the front of the bike and set aside a long afternoon.  I'd also recommend you also get Allen wrench socket ends of 5 & 6 mm, plus Torx T-40 to go on your standard 3/8" socket wrench set - you'll be much happier.  

The instructions provided are very good, and HT has a support website with more pictures and instructions.  There is also a nice Youtube video showing a full installation that you should watch a couple times before starting. 


I found the HT products to be manufactured to very accurate dimensions and you can expect it to fit perfectly.  T hat said, on the KLR this product is a tight fit and there's a fair amount of careful finagling to get everything in the correct position.  From experience, I can tell you that if you're installing things correctly, you can expect the pieces line up perfectly. If they're not lining up, its more likely you're the problem.


After installing, all the pieces tightened up in alignment and and the HT bars fit around all of the KLR plastic perfectly. The bars are rock solid and cross-braced and will definitely protect the machine. Should you damage one of the foldable foot pegs, they are easily replaceable from HT.  

An Unsolicited Endorsement for Happy Trails Product Support


In spite of the excellent instructions, photos and videos, there are still ways for you to have something out of position and stuff just doesn't line up!  Before you get frustrated, call or email HT support and they are very responsive, friendly, and knowledgeable.  I made a simple mistake myself and wasted a couple hours before a 5 minute call got me back on track. 

Summary


The Happy Trails PD Nerf and Skid Plate combo is highly recommended.  The HT people not only build good stuff but they stand by what they manufacture and help you after the sale.


Tuesday, October 30, 2012

About this Blog

About Me

I'm a long time motorcycle fan who learned to ride on the Enduro bikes of the 1970's such as the Yamaha DT360, Suzuki 185, etc.  My favorite movie as a teen was "On Any Sunday".

Long after most people have already had their mid-life crisis, I decided I needed to ride again. I bought a Kawasaki KLR650 and was both amazed at how much better dual sports are these days, and and reminded of their limitations and tradeoffs.  Then I discovered the Adventure Motorcycling movement, and got hooked on the Longwayround series. As I started to mod my bike, I found a few helpful sites, but I still ended up trying many things blind and learned a lot through trial and error.  This is my chronicle of how I arrived at a pretty good KLR 650 adventure bike and I hope you can learn from my experience.

About the Bike

My bike project began as as a completely stock 2009 KLR 650 that I bought used with 1200 miles on it.   Here it is today after all the mods: